COMMON IMPERFECTIONS IN CONCRETE
This is a list of some of the common imperfections to be expected in stamped or plain concrete. Please contact us if you don’t understand or don’t agree with this information. Please don’t expect concrete to be perfect. Please understand that stamped concrete rated at a “7 out of 10” has to be considered acceptable. This rating is done by us because it is relative to hundreds of other stamped concrete projects not just yours. We guarantee your job will have imperfections and “areas of ugliness”. We repair and touch-up and manage this as best as we can. We ask for your support and cooperation during the final detailing process.
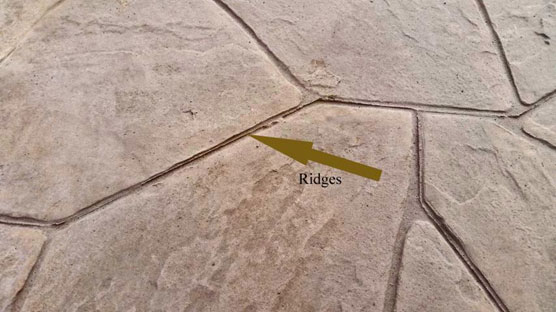
1) Ridges / “Fins”
Specific to stamped concrete. These are thin strips of concrete in the grout line area. These are referred to as ridges or fins. These occur where 2 stamp mats come together during the stamping process and push a bit of soft concrete in between and up where the 2 mats meet. Sometimes these are visible during stamping and workers can smooth them out and sometimes they are not visible or otherwise can’t be flattened during stamping. Most all stamped concrete will have at least a few of these ridges. Once your project is finished, if you have any that are a safety problem, ie hurt bare feet, these ridges can be “sanded” down with a grinder, however keep in mind the color will be disturbed, so aesthetically a ground-down ridge won’t look exactly like other grout lines so if they are not a safety issue, any remaining ridges would be left as-is.
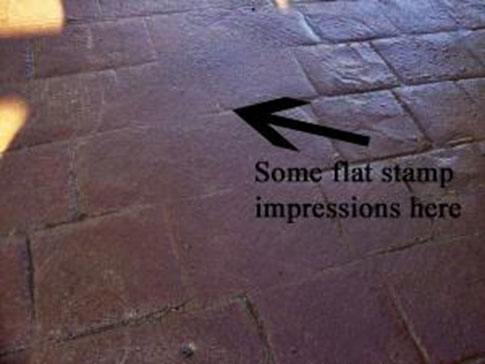
2) Shallow stamp impressions
Specific to stamped concrete. These are areas in the stamped concrete where the stamping mats / tools did not depress sufficiently into the soft concrete to create an impression as deep as other areas. This can happen for several reasons, mainly either the stamp is not pushed into the concrete hard enough, or more commonly if the concrete is getting to hard too fast too not allow the stamp to embed as deep as other areas. Often workers may not know this has occurred due to the release powder residue on the concrete during stamping. This condition can be corrected to some degree by hand grinding out the grout lines to recreate similar depth stamped grout lines. The surface of the “stones” can also be ground to resemble the texture from the stamps, but will typically not be exactly the same and will have some noticeable differences.
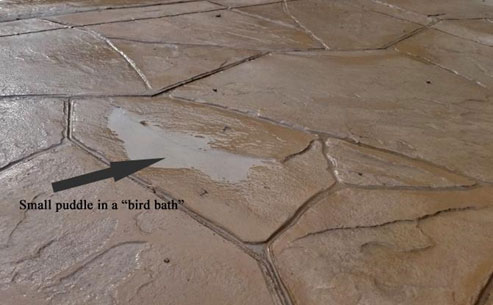
3) Bird baths
Specific to stamped concrete. This is a condition where there is a slight dip or depression in the new concrete that holds water. This is referred to as an area of puddling or “bird bath” since it resembles an actual small bath for birds.
This condition typically occurs during the stamping operation under the feet / shoes / boots of the workers.
This condition almost never occurs for plain broom finish concrete, the reason is that workers finish plain concrete from adjacent areas, maybe in the grass next to the new concrete, ie not walking *on* the new concrete, whereas for stamped concrete, workers are walking / working directly on the new soft, firming concrete. Timing is essential with stamped concrete. Workers will typically touch the concrete to assess how soft or firm it is to begin the stamping operation. The concrete can’t be too soft or too firm. While the stamping operation is in progress, there can be areas where the concrete is slightly less firm than other areas, combined with the weight of a worker / boots through the stamp, can create this depression. This is not necessarily carelessness or a mistake, this is simply a risk of being out on the concrete when it is still wet.
Most all stamped concrete will have areas that hold some water, due to either the texture of stamp impressions or combined with a bird bath here and there. There are 2 ways to improve water collecting in a “bird bath”. One is to grind down a channel or otherwise flatten a small area on that “stone” to let the water out. Another technique would be to add overlay material, ie cement-based coating material into that depression to effectively raise that spot so it does not hold water. Of course the color and overall texture would be aesthetically noticeable. If the situation is as minor as in the photo below, the advise would typically be to just leave it alone since aesthetically it would look worse trying to fix it and this won’t necessarily cause any long term problems.
4) Cracks
Applies to stamped or plain concrete. Concrete cracks. There is nearly a 100% chance that your concrete will crack. Our objective is not prevent the concrete from cracking, but rather the opposite. We want or allow the concrete to crack, but we attempt to direct the concrete to crack where we want it to crack, ie in the control joints where the cracks are not visible.
Control joints are those grooves that you see each 3-4 feet in any standard sidewalk. Those grooves are not there for “expansion and contraction” which is why most people think they are there. Those grooves, instead, are score lines that weaken the concrete so that *when* the concrete cracks (not “if”, but “when”) we want the crack to occur down in that groove where it is not noticeable.
In stamped concrete that groove is typically saw-cut with a power saw a day or two after the concrete is placed and stamped. The groove is a thin saw-cut line, typically on approx 12-foot spacing, and provides the same purpose of allowing the concrete to crack at that location.
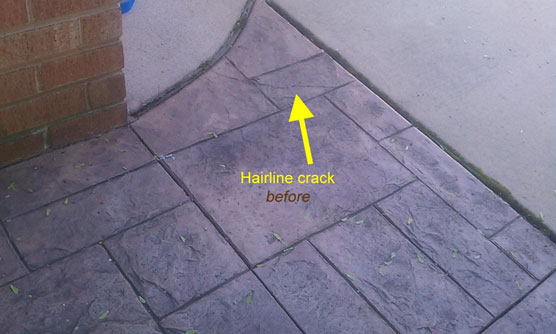
We estimate that control joints are 95% effective, so most often a crack will occur, but will be down in that joint where you don’t see it, However there is a 5% chance there will be a random crack that is not in the joint this is visible. If this happens, we do have a needle injected epoxy fill that we can put into the crack to make it look a bit better.
Any crack, whether in a control joint or random, ie visible and not in a control joint tend to never get worse because of the steel reinforcement in the concrete. This is one of the reasons we put steel reinforcement into concrete so that when it cracks, the crack will never get wider than a thin hairline crack.
Customers often worry about water getting in and the crack getting worse. That condition seems like something to worry about, but is not a condition that we ever see in practice. So the needle injected epoxy fill repair tends to be mostly for aesthetics and is not necessary for other reasons.
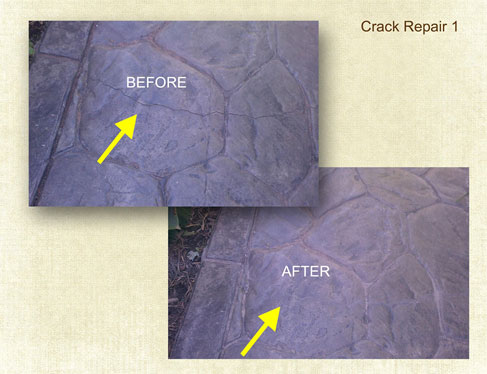
Before repair
After repair
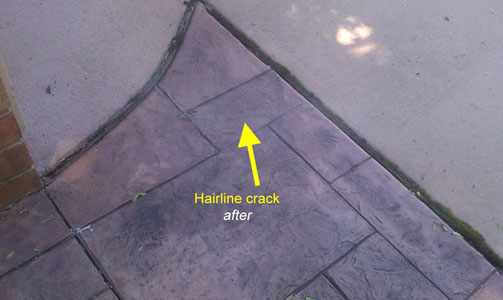
… still visible, but looks a bit better ...
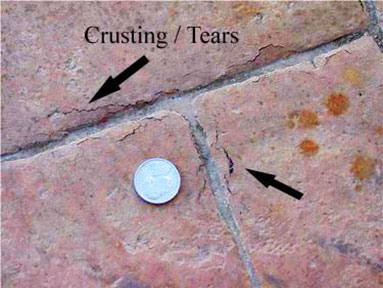
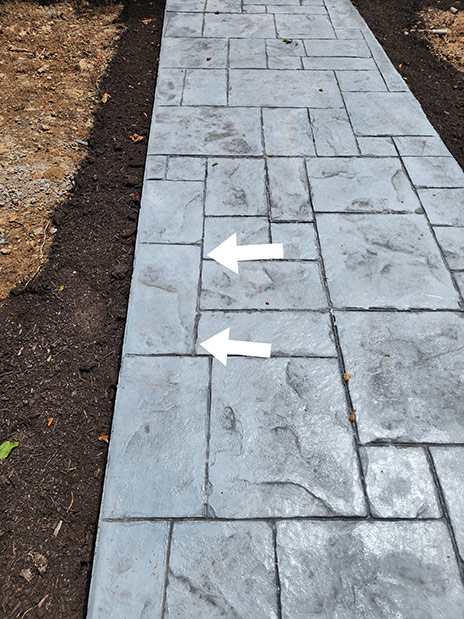
5) Tears / Crusting
Applies to stamped concrete only. This is a condition where small tears are visible typically near the edges of the “stones” in the pattern. Customers sometimes think these are cracks because they do resemble very small cracks, but technically they are tears or crusting. These tears are caused by the stamping tools / mats. These mats are pushed down by the workers to create an impression in the concrete. The force of these mats is primarily downward, but also produces some side-to-side or outward pressure, primarily toward the edges of the pattern and thus pulls the concrete apart to create the tears.
This condition does not happen in all stamped concrete. This condition is more likely to occur with certain weather or temperature conditions where the surface of the concrete gets firm a bit faster than the thickness of the concrete slab making the tears more likely.
Similar to other imperfections, workers may not necessarily know this is happening due to the release powder that is on the concrete during stamping. These tears never get worse and are cosmetic / aesthetic only. We have a touch up technique for this condition that can be used for extreme cases to essentially fill the tears to make them somewhat less noticeable.
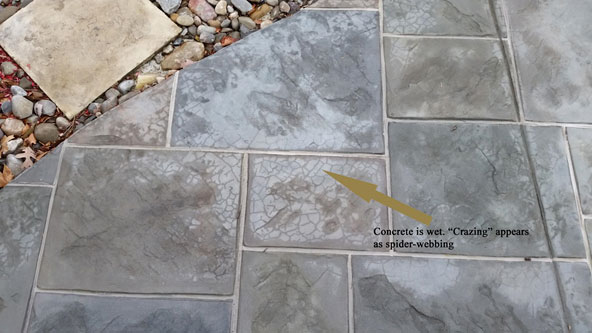
6) Crazing / Spider webbing / Surface shrinkage
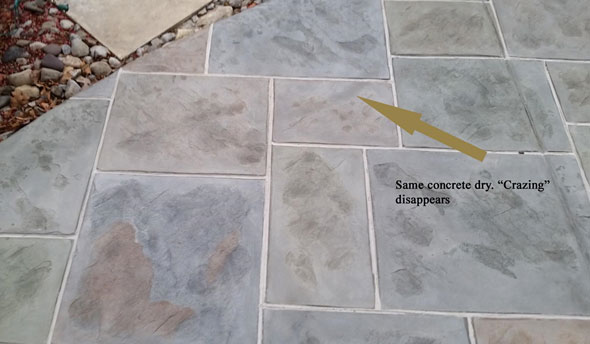
Applies to stamped or plain concrete. This is a condition where thin lines are visible in the surface of the concrete that resemble a spider web. This condition is most always visible only when the concrete is wet, and goes away when the concrete is dry. This is an unusual phenomenon with some concrete slabs and does not represent any substantial problem necessarily, it can just detract from the aesthetics of the concrete when it is wet. Crazing can be caused by certain temperature or weather conditions, or during curing as moisture evaporates from the new concrete. No touch-up available for this condition.
--- Crazing when concrete is wet
--- Crazing when same concrete is dry
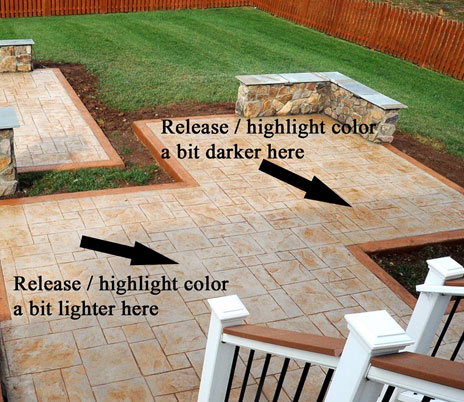
7) Release color unevenness
Applies to stamped concrete only. Release color is typically the darker of the 2 colors combined for traditional 2-color stamped concrete. Not the border color around the perimeter, 2-color stamped concrete refers to the 2 colors in the interior, main areas.
In this photo, the base color is a very light tan, and the release color is a rusty brown tone. Workers don’t apply the release color to the final color distribution, but instead they apply a “blanket” of the release color in the form of a powder, during the stamping operation and the stamps impress the release color into the surface of the concrete while the concrete is soft. Later, a day or two after concrete is placed and stamped, the release powder is washed off. Due to how the release absorbed and stamped into the surface of the concrete, more or less of the release will be left behind during the washing operation. Approx 95% of the release will be washed away and 5% or so will be left behind to create the “marbled” 2-tone effect.
Some customers may perceive this to be random, and natural and adds to the beauty of the patio, but other customers may perceive this to be uneven and unsightly.
So just like many of the other imperfections in this article, this is not a case of carelessness or inexperience, but instead a more uncontrolled condition of how the chemicals take to the concrete on that particular slab.
If this condition is extreme there are touch up techniques, but if the condition is as minor as in the photo below, this would typically be left as-is.
8) Stamp misalignment
As mentioned above, stamping concrete is much more difficult than you might imagine. The concrete is still wet while it's being stamped so workers can only stand on the stamp mats and not in the wet concrete, so maneuvering around within the new area being stamped has to be orchestrated and can sometimes feel like a high wire act.
Add to this, the stamp mats are upside down when being used and the patio is typically covered in a layer of powder. This can make it feel like you are stamping half blindfolded. Add to the difficulty, you only get one chance at the stamp. If you pick up the stamp and realize it's misaligned you can't restamp, there's really nothing you can do other than try a repair or touch up technique the following day but those options are very limited. The stamp mats fit together like puzzle pieces so once you put the first mat down the rest of the area follows with the first mat. There's not an easy way to bend or turn or adjust the mats since they lock together. So if the first mat is off by 1/16 of an inch, not really noticeable, by the time you get to the end of say a 30 or 40 ft run you might be off by couple inches. Workers never want stamp misalignment to happen, we want all stamped concrete to be perfect, but the reality is this happens and we manage this as best as we can.
9) Areas of Ugliness
Applies mainly to stamped concrete, but can apply to plain concrete as well. This is a “catch all” category regarding concrete stamping, coloring or finishing details that is typically for hard to reach areas such as around deck posts, around drain pipes, areas where concrete meets house or another structure, or areas near steps.
Stamping concrete in an open area is a difficult task and requires lots of experience. Stamping concrete in tight area is much more difficult and often leads to “areas of ugliness”. This can happen not because of carelessness or inexperience, but often can be nearly impossible to get perfect stamping and color detail in these areas. Also remember that there is a layer of release powder residue on the concrete which prevents workers from seeing completely what they are doing, somewhat like working partially blindfolded.
Another issue that customers often don’t consider is that workers when stamping concrete are “working against the clock”, ie as every minute passes, the concrete gets harder and harder and more more difficult to stamp. Workers must avoid spending too much time in one area at the expense of not getting to another area before the concrete gets too hard to work with. Workers would rather that 100% of the job is, say 80% perfect, rather than 75% of the job to be 100% perfect and the other 25% of the job is ruined.
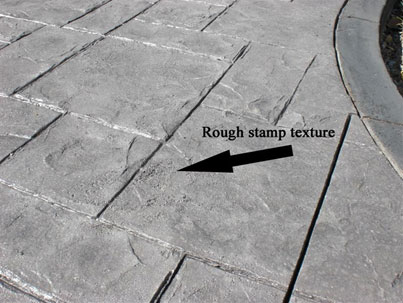
Rough stamp texture, this is very minor, best to leave this alone.
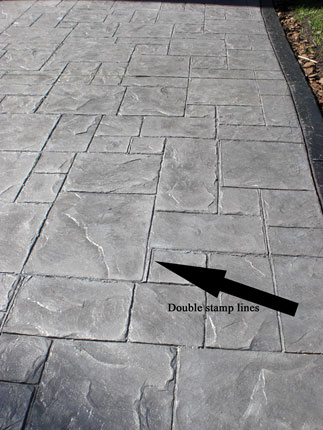
Stamps creates an extra or double line. Difficult to see or catch this during the stamping operation. As with some of the other imperfections, best to leave this as-is. Any repair may make it more noticeable.
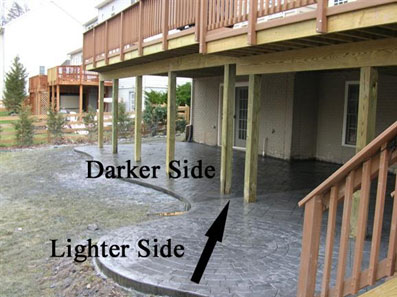
Patio poured on two separate days. The seam where one pour meets the other pour show a color variation between the concrete poured on day 1 vs day 2. Same batch of color, same workers, same concrete company used, same mix, same basic weather conditions. Good new is these colors blended out over the subsequent several days. This is another example where nothing was necessarily done wrong, but just some challenges with stamped concrete.

2011 SALZANO CONCRETE. ALL RIGHTS RESERVED